Pages

Friday, September 27, 2013

Download Videos even if downloading is blocked


Download Videos even if downloading is blocked


Sometimes downloading of videos are also blocked in any organizations and institutions. for ex. - you want to download a video from youtube, you opens that video on youtube but the downloader (like IDM) doesn't download the video.  To download some Videos you have to follow these simple steps


STEP 1 :-


Run the software "Ultra Surf". If anyone does not know how to do it or what is it. Just click here.


STEP 2:-


After successful connection in "Ultra Surf", you need a downloader like IDM (Internet Download Maneger) . You can download it here. It is a trial version for 30 days. To activate it after trial period click here.  Download and Install it. After Installation go to the options in IDM. It will look like this...


STEP 3:-

Go to Proxy tab and enter proxy"127.0.0.1" with port "9666". It will look like this...


Now click ok. After this process your IDM is configured according to the ULTRA SURF and you are free to download a video. IDM will give a download button on videos on your browsers like this...

If all goes well you will be able to download videos from blocked websites too.

Thank you

How to activate Internet Download Manager for free

Hello friends...
 
You can download this whole post as a PDF file. To download it click here.

This is a common problem faced by a user  who uses IDM.
When you download the Internet Download Manager for the first time, It gives you a trial period of 30 days. After 30 days it shows you the message of trial period over and IDM is exiting. It looks like this...


When you click OK it will show you a window like this...


Now click cancel and follow the steps below:-


STEP 1:-

Uninstall the IDM from Control Panel. After uninstalling restart the system.


STEP 2:-

To download the IDM with patch click here. It will take you to a webpage looking like this...


now click on download.


STEP 3:-

After downloading extract the file. Run the application and install the IDM. It may say Fake serial but no need to worry.


STEP 4:-

Copy the "Keygen+Patch" file from "Keygen+Patch" folder and paste it in to the installation folder. It is generally :
     C:\Program Files (x86)\Internet Download Manager
     OR
     C:\Program Files\Internet Download Manager


STEP 5:-

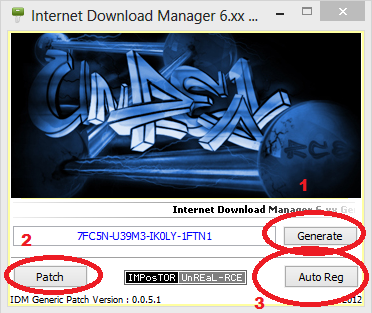
Run "Keygen+Patch.exe" and it will look like this...


    a) Click on Generate
    b) Click on Patch and select idman.exe
    c) Click on Auto Reg 
your IDM is registered successfully. If you update your IDM, you have to follow these steps again. 

If all goes well your IDM will be registered. If you have any queries please ask it into comments. Please Like Us on FACEBOOK here .

Thank you


Thursday, September 26, 2013

URL Obfuscating

"URL Obfuscating Web Proxies or Hide My Ass"

The problem with the web proxies is that the target website address that the user is visiting is revealed within the URL itself & hence this technique can easily be detected and blocked by your college or company administrator using a URL filtering technique. This is where some URL obfuscating proxies came into picture. OBFUSCATING is a technique of hiding a URL address in such a manner that nobody can figure out the actual website address by just looking at it. It makes it very tough for the network administrator to be able to detect and block you using URL filtering techniques.

STEP 1:-


One of my favourite URL Obfuscating proxy server is

"http://www.hidemyass.com"

It will look like this...


STEP 2:-


It allows you to encode a web address in such a manner that nobody can make any sense of it! all you need to do is type the requested web address in the space provided, select the URL encoding option & click on "hide my ass".


STEP 3:-


If you type www.youtube.com in the space provided, the "hide my ass" will obfuscate the web address. Here not only the URL has been encoded, but even title bar text has been changed. It will look like this...


Now the blocked website is unblocked. Encoded URL's that are created by hide my ass remain same permanently. In other words, you can bookmark the above mentioned encoded URl and use it at your convenience.

Encoding is fantastic, but an even better option is the encryption option available on the hide my ass website. The advantage of using the encryption option is that it is a temporary encrypted URL that expires after a set period of time. This means that even in the future, nobody else can view the web pages that may have been visited through it, giving you complete anonymity.

URl obfuscating web proxies are very useful, but they could be blocked by your network administrator. In case they block the popular web proxies, then you can always find new web proxies that have not been blocked by encrypting the URl again and continue to access your favourite blocked websites. It is an endless cat-and-mouse game

It is important to note that if you want to log into any of your online accounts (like facebook, gmail & yahoo), you will need to find and use a web proxy that accepts cookies. Another problem with web proxies is taht many of them do not support JavaScript and SSL encryption, which means that a number of websites will not work. For example, you may not be allowed to watch streaming videos on youtube if scripts are not supported by your proxy.

If all goes well you will be able to get the internet access again and till you want. If you have any queries please ask it into comments.

Thank you

Firewall Tunnelling using SSH & Putty


"Firewall Tunnelling using SSH & Putty"

SSH (Secure Shell) is a protocol that allows two devices to connect and exchange data securelyin an encrypted format. It usually uses the port 22 for all communication. It protects your sensitive information like username and password by encrypting it and securely transmitting it over internet.
PuTTY is a free, open source client that allows users to establish connections using SSH, Telnet etc. with remote systems. To download it, click here. It will open a window like this...


Let us assume that you are connected to the internet and are behind the firewall of your college or company that doesn't allow you to make outgoing connections to remote Port 80 (HTTP or websites) of a particular website, say facebook. Just because the firewall has blocked access to remote Port 22, it doesn't mean that it would have also blocked outgoing connection to remote Port 22 (SSH). This means that you may be able to use PuTTY to create a SSH Tunnel connection through the firewall (outgoing remote Port 22) to a remote SSH server that you have access to and then use this remote SSH server to connect to the blocked remote systems. In other words, your firewall thinks that you are connecting to Port 22 of a harmless system, but in reality you are using that system to connect to facebook. The process is shown in following steps:-


STEP 1:-


You need to either set up your own SSH server with unblocked Internet access or register an account on a SSH server that has unblocked access to the Internet. This SSH server can be in any part of the world.


STEP 2:-


Use PuTTY to create an encrypted SSH connection to the remote SSH server. (Outgoing Port 22, encrypted communication will be allowed by most local firewalls.) PuTTY opens a local Port that you can now connect to in order to access the remote SSH server.


STEP 3:-


Once you have connected to remote SSH server that has unblocked access to the Internet, you can then use it to access all your favourite websites on the internet.

Let us assume that your firewall has blocked outgoing connections to remote Port 25 and 80 and you want to use PuTTY and SSH to bypass this Blocking mechanism. Now follow the steps to do this...


STEP 1:-


Download PuTTY and click on Session. In the hostname field enter the IP address of the SSH server that you want to connect to. In the port field enter 22.


STEP 2:-


Click on connection>SSH>Tunnels and enter the IP address and Port numbers of the blocked remote systems you wish to tunnel to. For example, I entered 110 in the source port field & 192.168.0.11:110 in the destination field then clicked on ADD. It will look like this...


STEP 3:-


Based on this configuration, now the local port 80 on your system will connect to port 80 on 190.168.0.1 (using SSH connection to SSH server) and the local port 25 will connect to Port 25 on 192.168.0.22 and so on. As simple as that.


STEP 4:-


Now click on the OPEN button, you will be prompted to enter the SSH server username and password. You would have received it when you created an account on the remote SSH server. PuTTY now starts to listen to port 80 and port 110 on the local system. Now in order to access the port 80 on 192.168.0.1, you need to start your browser or any other tool and simply type local host: 80 or local host: 110 & press enter! It is also possible to buy SSH Tunnel accounts on various websites like "https://camolst.com/sshtunnel/" which is currently providing a SSH tunnel account to users at a subscription price of $5 per month.

If all goes well you will be able to get the internet access through tunneling and till you want. If you have any queries please ask it into comments.

Thank you

Unblocking Facebook and other websites over Internet


"Unblocking Facebook and other websites over Internet or use of ULTRA SURF"


Sometimes we can't access facebook even if we are connected to internet properly in an institute or in organization. This is due to the blocking of websites for safe web surfing. These organizations blocks some websites including Facebook, Youtube and many other Porn Websites to remove overload from their slow internet servers.
Here is a simple method to unblock these websites. you must follow these simple steps:-


STEP 1:-


Click here.

you will get a webpage like this...


STEP 2:-


Now click the download button situated in the right corner.
Download the file. It's size is only 1.5 MB.


STEP 3:-


Install the downloaded file. After Installation it will look like this...


It will either say "Sucessfully connected to the Server" or "Connection Failed"
If it says "Sucessfully connected to the Server" then follow the step:-5. otherwise continue step:-4.


STEP 4:-


If it says "Connection Failed" then you must check options. That will look like this...


then you must click on "Proxy Settings". It will look like this...


Here you can enter your organization's proxy manually. For example proxy host is "10.0.2.11" and proxy port is "3128".
then click ok and restart the ultra surf. Now It will show you "Sucessfully connected to the Server".


STEP 5:-


After "Sucessfully connected to the Server"....you have one another running proxy that is "127.0.0.1" with port no. "9666".
Now you have to integrate this new proxy into your browser. It is automatically done in "Internet Explorer". but I will show you how to do it manually.
For Internet Explorer you have to click internet options. It will look like this...


After opening options you have to click "connections" tab and then "LAN settings".


It will open a window like this...here you have to enter the new proxy as shown in figure. Then click ok.


this process can also be done in "mozila Firefox" and "Google Chrome".

If all goes well you will be able to open all the blocked websites.

Thank you

Unblocking Download limits with "MAC Spoofing"


Unblocking Download limits with "MAC Spoofing" or changing the MAC address.

Each network interface(like Wireless card, Ethernet card) on every computer on the internet has a unique MAC address. MAC stands for "Media Acess Control". Companies and colleges may have a policy on how much data each user can download from internet in a specific time. Such download limit are forced by recording the MAC address of all the users and then keeping track of the amount of data downloaded by  the users. If any MAC address reaches the download limit, then his internet access is taken away.
To get the internet access again, you have change your MAC address. Changing the MAC address is called "MAC Spoofing". Follow these steps to get internet access through MAC Spoofing...


STEP 1:-


First check your System's MAC Address. It is possible to view the MAC Address by going to the "MS DOS" prompt and typing the command:-
getmac -v


STEP 2:-


For MAC Spoofing you have to use a software named "Mac Makeup" ver. 1.95d. To download it click hereIt will open a webpage like this..


now click download.


STEP 3:-


It will take you to a webpage where 3 downloading mirrors are available. Choose for yourself. you can choose any of them...


STEP 4:-


After downloading, Run the software. But it would not run simply. It will give you a error code like this...


Now click ok.


STEP 5:-


Now right click the application and click on "Run as administrator" like this...

STEP 6:-

Now it will run and look like this...


here you can see the empty "new address bar".


STEP 7:-


All you need to do is to enter the new MAC address and then click "change button". you can also choose "generate ramdom" for new address.


STEP 8:-

It will take around 30 seconds to change the MAC address. Now again check the MAC address by command "getmac -v" in "MS dos" prompt. It will look like this...


Sometimes, administrators have no restrictions on the amount of data download. This means that if you are able to spoof your MAC address and pretend to be one of the administrator then you may be able to get unlimited downloads on your system as well!!

To get the Internet access you need the valid MAC address on the same network. It is quite easy to find out some other user's MAC address by simply running "DATA SNIFFER" on your system to sniff data packets being sent across the network.


If all goes well you will be able to get the internet access again and till you want. If you have any queries please ask it into comments.

Thank you

How to increase system start up speed using MSCONFIG


When our windows is newly installed into our pc, it's start up speed is very fast. but after some time when some softwares are installed, start up speed starts to decrease. later on our system seems to be so slow that we can't tolerate it.
Here is a small trick to increase start up speed effectively using "MSCONFIG". Follow these steps to increase your system speed extreamly:-


STEP 1:-


Click on "START" button. Here you can see a search bar. It will look like this...


STEP 2:-

Now type "MSCONFIG" in that search bar. When you finished typing "msconfig" it will look like this...


STEP 3:-


Now run that file. after clicking on that file a window will open that will look like this...


STEP 4:-


Click on start up tab. Now you can see some softwares installed on your system which also run on startup. Here you can either choose which softwares are to be run on start up or you can also choose "disable all", which will disable all the softwares from start up. It will increase your speed at maximum rate.


Now click ok.


STEP 5:-


It will ask you to restart the system. Now simply restart the system or you can restart later.

If all goes well you will be able to speed up your system's start up speed. If you have any queries please ask it into comments.

Thank you

READY BOOST to increase system performence


"How to use a PEN DRIVE as RAM memory."

Some times we have to increase our system performence to play high graphics game, or just some other work which takes the 100% storge of RAM memory. If our System's RAM memory is 1 GB or 2 GB, it is too little to do that work simply or play that game freely. The game will start stucking. Now we need 1 or 2 GB RAM memory extra. Here is a simple trick "READY BOOST" to use any removable media like pen drive or sd card etc. as RAM memory...


Step 1:-


Connect your removable media. Here I will show you this trick with my 1 GB memory card. First of all, your removable media should be empty. There should be no data on that device.


STEP 2:-


Right Click on the sd card and then click on PROPERTIES. It will look like this...


Step 3:-

Now click on "READY BOOST" tab. Here you can see the "do not use this device" option ticked. It is shown in the figure...


Step 4:-


Now all you need to do is Click on "use this device" and select how much storage of your device, you can give for increasing your system speed. More the available storage for READY BOOST, more the system speed. Now click ok. It will look like this...


Step 5:-


After clicking ok the device will look filled up. It will look like this...


If all goes well you will be able to increase your system's speed and performence. If you have any queries please ask it into comments.

Thank you